As an Amazon Associate, we earn from qualifying purchases. Some links on this site are affiliate links at no extra cost to you. Our recommendations are based on thorough research and editorial judgment.

How to Read Labels on Pressure Washer Detergents Correctly
I start by checking the claim on the label, which tells me the primary cleaning purpose like degreasing or glass cleaning, then I verify the surface list includes the material I’m treating, such as wood, concrete, or metal, because mismatched surfaces can cause etching or discoloration. Next, I read the ingredient hierarchy to confirm biodegradable surfactants, low‑pH or, and corrosion‑inhibiting additives, while avoiding fragrances, phosphates, or bleach that could damage seals. I follow the exact dilution ratio, use a calibrated cup, and test a hidden spot before full application; the nozzle type and washer pressure must match the detergent’s rating to prevent foaming or equipment wear. If you keep these steps in mind, the rest of the guide will expand on each point.
Key Takeaways
- Identify the primary claim (e.g., Degreaser, All‑Purpose) and ensure it matches the surface you’ll clean.
- Verify the surface list includes your material and check pH/additives for material tolerance.
- Follow the label’s exact dilution ratio, using a calibrated cup and mixing detergent before water.
- Confirm the detergent’s pressure rating and use the recommended low‑pressure fan nozzle for application.
- Perform a spot test on a hidden area before full coverage to detect any damage or excessive foaming.
Core Labels on Pressure Washer Detergent – What They Mean
Ever found yourself staring at a pressure‑washer detergent bottle, wondering what the bold claim really means? The top line—like “Degreaser,” “Glass Cleaner,” or “All‑Purpose Cleaner”—is the quick guide to the main job the product does, the surfaces it’s built for, and the kind of grime it attacks, whether that’s grease, mildew, or mineral stains.
Frankly, the label is set up in a clear hierarchy that helps you match the product to your project. The claim hierarchy appears in bold, showing the intended use; underneath, the surface hierarchy lists roofs, siding, concrete, or glass. The ingredient hierarchy follows, detailing surfactants, solvents, and additives. By reading each level, you confirm compatibility, avoid misapplication, and guarantee peak cleaning performance.
Here’s the trick: start with the claim, then check the surface list, and finally glance at the ingredient details. If you’re cleaning a deck, look for a “Wood Cleaner” claim and make sure the surface hierarchy mentions wood. If the ingredient list includes mild surfactants, you’ll know it won’t damage the finish.
Worth knowing: many brands group similar cleaners under an “All‑Purpose” label, but the ingredient hierarchy can still tell you if it’s safe for delicate glass or tough concrete. Look for terms like “non‑ionic surfactant” for general use or “solvent‑based” if you need heavy‑duty grease removal.
Try this: before you buy, write down the surface you’ll clean, then compare it to the label’s hierarchy. If the surface hierarchy doesn’t list your material, skip that product. It’s a quick step that saves time and money.
A quick glance at the ingredient hierarchy can also reveal any added fragrances or dyes—handy if you’re sensitive to chemicals. Some cleaners include rust inhibitors, which are great for metal railings but unnecessary for painted walls.
By paying attention to each level, you’ll avoid the common mistake of using a glass cleaner on a concrete driveway, which can leave streaks and waste money.
Pick the Right Cleaning Purpose & Surface for Your Detergent

Ever found yourself staring at a stubborn stain and wondering if you picked the right cleaner? The trick is to match the detergent’s main claim—like Degreaser, Glass Cleaner, or All‑Purpose Cleaner—to the surface you’re tackling. Each formula is tuned with surfactants and solvents that work best on certain dirt types and material limits.
Start by checking the label’s surface‑type list, then pair it with what you’re cleaning—smooth glass, rough concrete, or porous wood. That way the product can get in without etching. Seasonal factors matter, too. A winter‑time de‑icing residue calls for a stronger degreaser, while summer pollen on siding needs a milder all‑purpose blend.
Frankly, you also want to make sure the product’s pH and additives line up with the material’s tolerance. A quick test on a hidden spot will tell you if there’s any discoloration before you go all in.
Try this:
- Look at the primary claim on the bottle.
- Match it to the surface type you have.
- Verify pH and additives.
This systematic approach prevents damage and maximizes cleaning efficiency.
Now you’ve got a simple plan that keeps your home looking fresh without guesswork. Ready to give it a shot?
Mix the Correct Dilution Ratio for Pressure Washer Detergent

Got a pressure washer and a bottle of detergent but not sure how to mix ‘em right? You’re not alone—getting the dilution spot on can be a bit of a guessing game.
First, flip the label over and check the ratio chart. Grab a calibrated measuring cup so you’re not guessing. Pour the exact amount of detergent into a clean bucket, then add the right amount of water. Give it a gentle stir; you want the solution stable, not a mountain of foam.
Next, avoid over‑filling the bucket. Too much liquid will thin the mix and cut your cleaning power. A good rule of thumb: fill just enough to cover the area you’re working on, then stop.
Now’s’s a quick test spot. Spray a small patch and watch how fast the surfactant lifts the grime. If it seems weak, tweak the ratio a bit—maybe a touch more detergent. If it’s foamy, add a splash more water.
Here’s the trick:
- Use the same measuring cup for each batch. Consistency is key.
- Keep the bucket clean; old residue can mess with the new mix.
Worth knowing:
- A well‑diluted solution protects your washer from buildup.
- Too strong a mix can leave streaks or damage delicate surfaces.
By sticking to these steps, you’ll get reliable cleaning results every time and keep your pressure washer happy.
Ready to give it a try? What’s the first surface you’ll tackle with your fresh mix?
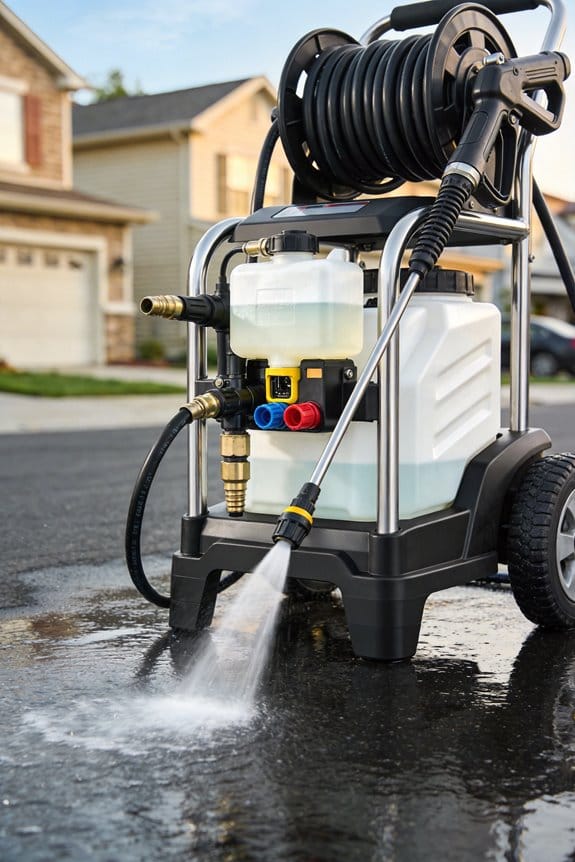
Ensure Detergent Compatibility With Your Washer Model & Nozzle

Ever wondered why your washer sometimes makes a weird clunk after you add detergent? That sound is usually a sign that the cleaner you chose doesn’t match your machine’s pressure or temperature limits. Skipping this check can bite the pump, wear out sealing O‑rings, or even void the warranty.
I always start by flipping through the user manual and matching the detergent’s pressure rating to my washer’s PSI and GPM specs. Then I double‑check that the formula can handle the hot or cold water your model uses.
Worth knowing:
- Look for the pressure rating on the detergent label and compare it to your washer’s limits.
- Pick a low‑pressure fan nozzle for soap application, and make sure the spray angle follows the label’s recommendation.
Doing this before each load saves you from chemical corrosion and premature seal wear. It also keeps your cleaning power at its best without the guess‑work.
Frankly, the easiest way to avoid trouble is to do a quick nozzle calibration before every wash. A properly set nozzle spreads the soap evenly and prevents high‑pressure bursts that can damage internal parts.
If you ever feel unsure, just pause and consult the manual again—your washer will thank you.
Give it a try and see how much smoother your cycles run. Ready to keep your washer humming happily?
Essential Safety Gear & Precautions for Using Detergent

Ever had a pressure‑washer spray turn into a tiny chemical disaster? When you’re mixing detergent, a splash can mess up your eyes, skin, and lungs fast.
First things first, slip on safety glasses and a pair of chemical‑resistant gloves. Make sure the glasses sit snugly and the gloves aren’t torn—any breach can let the concentrated mix bite you. Throw on a long‑sleeve shirt and pants so nothing is left exposed.
Fair warning: some detergents become flammable when they meet hot water. Keep a fire‑extinguishing blanket within arm’s reach, just in case.
You’ll also want good airflow. Never work in a cramped spot without ventilation; the aerosol can irritate your throat or trigger asthma. Open a window or use a fan to move the air out.
Worth knowing: store the detergent in a sealed container, away from kids and pets, and label it with the proper dilution ratio. That way you won’t accidentally over‑mix next time.
When you’re ready to test, spray a tiny patch first. If it looks good, move on to the full job using the nozzle the manufacturer recommends. Keep the spray pattern tight so you don’t waste product or get splatters on nearby surfaces.
Try this: after each use, rinse your gloves and glasses with clean water, then let them dry before stashing them away. It helps keep the gear in good shape and stops any residue from building up.
If you ever feel a sting in your eyes or a burn on your skin, rinse the area with plenty of water and seek medical help if it doesn’t clear up quickly.
Watch Out for Ingredient Red Flags in Detergent Formulas
Ever opened a detergent bottle and wondered if it might mess up your pressure washer or irritate your skin? You’re not alone. Before you even pour anything into the tank, a quick scan of the ingredient list can save you a lot of hassle.
First, keep an eye out for fragrances, phosphates, bleach‑based compounds, and high‑pH surfactants. Those are the usual suspects in cheap formulas and they can corrode seals, cloud water, and irritate eyes and skin. I always pick products that are phosphate‑free, fragrance‑free, low‑pH, and biodegradable—look for a washer‑safe certification on the label.
Frankly, synthetic musk is another red‑flag. It can linger on surfaces and cause skin irritation, so steer clear. Enzyme stabilizers can break down under high heat, leaving residues that clog filters. If you spot any of these, it’s best to toss the bottle and choose an eco‑friendly alternative.
Here’s the trick: check that the label lists biodegradable surfactants, corrosion‑inhibiting additives, and clear dilution ratios. A product that meets those criteria will keep your washer running smoothly and protect your health.
- Look for “biodegradable” and “washer‑safe” claims.
- Verify the dilution instructions are easy to follow.
When you find a product with any of those warning signs, discard it. Opt for a certified, greener option instead.
Got any favorite low‑pH cleaners you trust? Let’s hear about them.
Choose the Proper Nozzle for Soap Application and Rinsing
Ever tried to get your car clean without leaving a mess everywhere?
The trick starts with the right nozzle for soap and rinsing.
I usually kick things off with a low‑pressure, 65° black nozzle. It sprays a gentle, wide fan that lets the detergent soak in and break down grime without stripping paint or sealants. The wide pattern also keeps the spray from splattering onto nearby surfaces, which saves you time and cleanup later.
After the soap has had a chance to work, I swap to a high‑pressure, 0° or 15° metal nozzle for rinsing. That narrow jet blasts away residue fast while using less water. Just make sure the nozzle’s PSI rating matches your washer’s output so you stay within the detergent’s safe range.
Worth knowing:
- Low‑pressure, 65° black nozzle for applying soap
- High‑pressure, 0°/15° metal nozzle for rinsing
This two‑step approach gives you strong cleaning power without the wild splatter that can damage both the surface and the machine.
Try this: keep an eye on the pressure gauge and adjust the nozzle if you notice the spray getting too intense. It’s a simple habit that protects your paint and saves water.
Fair warning: using a high‑pressure nozzle for soap can strip away sealants and cause uneven coverage.
Do you think you’ll give this nozzle swap a try on your next wash? Let’s see how it works for you.
Troubleshooting Common Pressure Washer Detergent Mistakes
Ever found yourself spraying a driveway and ending up with a foamy mess instead of a clean surface? Skipping the label’s dilution ratios or ignoring the recommended nozzle can turn a simple wash into a streaky, wear‑prone job. The detergent’s chemistry and pressure settings need to stay in sync, or you’ll see foaming, streaks, and even equipment wear.
The first thing to check is the concentration. Using too much concentrate leaves a chemical residue that attracts dirt and can corrode seals. Measure the solution precisely, then set your pressure to the suggested level. Spray each area evenly before rinsing, and you’ll avoid most of the common pitfalls.
If lingering suds appear after rinsing, lower the concentration and increase the rinse time. Excess foam usually means the dilution and application timing don’t match. While you’re at it, inspect the nozzle for clogging; replace it if the spray pattern looks uneven. Also, double‑check that the water temperature follows the label’s recommendation—too hot can cause unwanted buildup.
Worth knowing:
- Always use the nozzle size the manufacturer suggests for the detergent you’re using.
- Keep an eye on the spray pattern; a smooth, even flow means you’re on the right track.
Try this:
- Fill a clean bucket with the exact amount of water and concentrate the label calls for.
- Mix gently to avoid creating bubbles.
- Test the spray on a small, hidden spot before tackling the whole area.
Fair warning: Too much pressure can break down the detergent’s formula, while too little won’t lift grime effectively. Adjust the pressure based on the surface you’re cleaning—harder surfaces need a bit more push, but gentle surfaces like painted decks benefit from lower pressure.
When you follow these steps, you’ll get a spotless finish without the hassle of foamy residue or worn‑out equipment. Have you tried tweaking your dilution and pressure settings yet? Give it a go and see the difference for yourself.
Frequently Asked Questions
Can I Use a Detergent on a Cold‑Water Pressure Washer?
I can use a detergent on a cold‑water pressure washer if it’s labeled cold compatible formulas; avoid temperature sensitive concentrates, which won’t dissolve properly and could damage the machine or reduce cleaning efficiency.
Do Biodegradable Detergents Work on All Surfaces?
I’ll tell you straight: biodegradable detergents work on most surfaces, but compatibility varies and surface limitations exist—some delicate finishes may need gentler formulas, so always double‑check the label first.
Will a Fragrance‑Free Formula Affect Cleaning Performance?
I’ve found that a fragrance‑free formula doesn’t hurt cleaning power; the scent impact is minimal, and the surfactant concentration stays the same, so performance remains consistent across surfaces.
Can I Store Mixed Detergent Solution for Later Use?
I’ll tell you plainly: don’t keep mixed detergent forever—store it up to a week in a sealed, chemical‑compatible container, then toss it if it smells or separates, otherwise you’ll waste money.
Are There Any Restrictions for Using Detergents With Electric Washers?
I’d avoid any detergent that isn’t labeled for electric washers; electrical safety’s key, and using the wrong formula can void warranty concerns, so stick to manufacturer‑approved, low‑pressure soaps.